Amy's Wandering

Wandering through life one season at a time

  • Home
  • {Start Here}
  • {Funschool}
    • Mad Libs
  • {Nature Notebook}
  • {Printables}
  • {Homeschool for FREE}
    • Free Curriculum Links
    • Create Your Own Curriculum
  • {Curriculum}
    • Assignment Sheets

irish dinner

March 16, 2010 By: amyswandering1 Comment

This is a re-post from March 10, 2009


Jason & I lived in Ireland for a year before we were married. We went as part of a missionary apprentice program, working with the youth group at a church in Dublin. I have fond memories of riding the train home carefully holding a white bakery box tied with twine – inside was my favorite cream sponge cake. This meal is easy to make for a big group!

Menu:

Beef & Guinness Stew
Fried Cabbage with Bacon
Buttered Boiled Potatoes
Irish Brown Bread
Victoria Sponge Cake

Beef & Guinness Stew
2 1/2 lb beef stew meat
2 large onions, peeled & sliced
6 medium carrots, peeled & sliced
2 tbsp seasoned flour
oil
1 cup of Guiness and water mixed

Toss the beef in the flour and brown quickly in hot oil. Remove the beef and fry the onions gently until transparent. Return the beef and add the carrots and the liquid. Bring just to the boil, reduce the heat to a very gentle simmer, cover closely and cook and cook for 1 1/2 – 2 hours. Check that the dish does not dry out, adding more liquid if necessary.

Fried Cabbage with Bacon
1 lb. shredded cabbage
2 oz. bacon
1 onion finely chopped
2 T. olive oil
1 clove garlic crushed
salt & pepper

In a large frying pan, fry onion & bacon in olive oil for about 5 minutes over medium heat. Add crushed garlic & cook for another 2-3 minutes. Stir in cabbage, stirring occasionally. Cook for about 10 minutes, or until reduced in volume but still slightly crisp. Season with salt & pepper to taste.

Buttered Boiled Potatoes
Peel Yukon Gold potatoes and cut into large chunks. Boil until tender but not falling apart. Drain and add several tablespoons of butter (do not use margarine). Stir to coat and add salt to taste.

Irish Brown Bread

1 3/4 cups all purpose flour
1 3/4 cups whole wheat flour
3 tablespoons toasted wheat bran
3 tablespoons toasted wheat germ
2 tablespoons old-fashioned oats
2 tablespoons packed dark brown sugar
1 teaspoon baking soda
1/2 teaspoon salt
2 tablespoons (1/4 stick) chilled unsalted butter, cut into pieces
2 cups buttermilk

Preheat oven to 425 degrees F. Butter a 9×5×3-inch loaf pan. Combine first 8 ingredients in large bowl; mix well. Add butter; rub in with fingertips until mixture resembles fine meal. Stir in enough buttermilk to form soft dough. Transfer dough to prepared loaf pan.
Bake until bread is dark brown and tester inserted into center comes out clean, about 40 minutes. Turn bread out of pan and cool right side up on rack.

Victoria Sponge Cake
3/4 lb. plus 1 tbsp. salted European-style high-fat butter,
softened
3 cups plus 1 tbsp. self-rising cake flour
1 1/2 cups granulated sugar
4 eggs
1 1/4 cups double Devon cream (can use heavy whipping cream)
3/4 cup high-quality strawberry jam
Confectioners’ sugar

1. Preheat oven to 360º. Grease two 2″-deep 8″ round cake pans with 1/2 tbsp. butter each. Dust each with 1/2 tbsp. flour; set aside.
2. Beat remaining butter in a large bowl with an electric mixer on high speed for 5 minutes. Add granulated sugar and beat until light and fluffy. Combine eggs and 6 tbsp. water in another bowl. Add half the egg mixture and half the flour to butter–sugar mixture. Beat well for 1–2 minutes. Add remaining egg mixture and flour; beat batter for 5 minutes.
3. Divide batter between prepared pans. Bake until a toothpick inserted in center of cakes comes out clean, 35–40 minutes. Invert cakes onto a rack, remove pans, and let cool completely.
4. Beat cream in a medium bowl until stiff. Put 1 cake layer on a cake plate, spread top with half the jam, then cover jam with the cream. Spread top of remaining cake layer with remaining jam and place it, jam side down, on top of cream. Dust cake with confectioners’ sugar.
Share this:

  • Click to share on Pinterest (Opens in new window)
  • Click to share on Facebook (Opens in new window)
  • Click to share on Twitter (Opens in new window)
  • Click to share on Reddit (Opens in new window)
  • Click to share on Tumblr (Opens in new window)
  • Click to share on LinkedIn (Opens in new window)
  • Click to share on Pocket (Opens in new window)
  • Click to email a link to a friend (Opens in new window)
  • Click to print (Opens in new window)

review – Artistic Pursuits

March 15, 2010 By: amyswanderingcomment

Artistic Pursuits is something that I have had my eye on for a couple of years now, but wasn’t sure if it would be worth the money. I can now confidently say that it is worth every penny.

Art is one of those things that gets pushed to the back burner around here. I took art in school and loved it. Every year I have plans to sneak it into our schedule, but 1 (lame)mommy + 5 kids = no time for art.

This is where the beauty of Artistic Pursuits comes in. All Mommy has to do is gather up the needed supplies, hand over the book and say,”Have fun!”. Your older child can just open the book and learn. If you have a younger child, it is still easy because you can open and teach.There are books for preschool through high school.

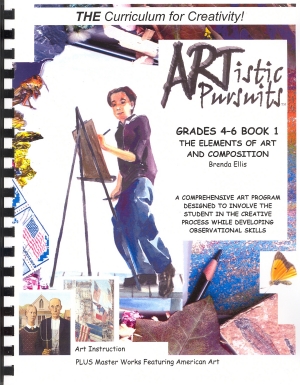
We chose to receive Grades 4-6, Book One, The Elements of Art and Composition. You can see samples from this book HERE.

Each Unit is broken down into four lessons:

  • Lesson 1 Explore Your World
  • Lesson 2 Appreciation & History
  • Lesson 3 How To
  • Lesson 4 Final Project

Things I Like:

  • Work independently
  • The student gets to choose what to draw using the techniques learned in the lesson
  • Real art lessons, not just projects/crafts
  • High quality paper and images

The Nitty Gritty:

  • $42.95 each book

Value: This is a high quality, non-consumable product for a fraction of the price of art classes.

See what my TOS Crew Mates have to say about Artistic Pursuits!

I received a free Artistic Pursuits book for the purpose of writing an honest review. No other compensation was given.


Share this:

  • Click to share on Pinterest (Opens in new window)
  • Click to share on Facebook (Opens in new window)
  • Click to share on Twitter (Opens in new window)
  • Click to share on Reddit (Opens in new window)
  • Click to share on Tumblr (Opens in new window)
  • Click to share on LinkedIn (Opens in new window)
  • Click to share on Pocket (Opens in new window)
  • Click to email a link to a friend (Opens in new window)
  • Click to print (Opens in new window)

zooming right along

March 15, 2010 By: amyswanderingcomment

Our computer died over a week ago … oh the horror!!  Tax refund came in on Friday, so I’m having fun learning to navigate our new laptop.

It is a good thing that this week is Spring break because I have a ton of stuff to share with you. Stay tuned!!

Share this:

  • Click to share on Pinterest (Opens in new window)
  • Click to share on Facebook (Opens in new window)
  • Click to share on Twitter (Opens in new window)
  • Click to share on Reddit (Opens in new window)
  • Click to share on Tumblr (Opens in new window)
  • Click to share on LinkedIn (Opens in new window)
  • Click to share on Pocket (Opens in new window)
  • Click to email a link to a friend (Opens in new window)
  • Click to print (Opens in new window)

review – Graphics Toolbox

March 9, 2010 By: amyswandering2 Comments

~ This review is a bit longer than normal, but this is an expensive product. I want to give you a good idea if it is right for you or not.~

I was very excited to review Graphics Toolbox. I can zip around the internet like a Nascar driver, but I am a dunce when it comes to doing anything on the computer itself. My husband seems to magically know how to find/create/fix everything on our computer. I just try not to crash it.

Graphics Toolbox is the brainchild of Lynda Holler. She worked in the NYC fashion industry for over 25 years, using a sophisticated graphics program that cost thousands of dollars. She gathered together a team to help create a program using similar techniques, but affordable for the everyday user.

It will come as no surprise that I have very little graphics knowledge. I am good at copying and following instructions though, and that is what I like about this software. I found it very easy to find the info I needed in the manual. Crew members were also able to take part in training sessions, some of which you can watch in the tutorials. This program is far from simple to learn, however. You will need to put a large chunk of time and effort into it to reap the rewards.

So what do I plan plan on doing with Graphics Toolbox? My main interest is learning how to design things for my blog. That little button over on the top right for my Link & Think blog took me an embarrassing numbers of hours to produce. I used tutorials that I found on other blogs and three different photo/graphics sites to piece it together. (Remember… computer dunce.) I think it probably would have taken me less than 10 minutes with Graphics Toolbox (not counting the time it took to learn how, so maybe 30 minutes total).

Some other uses for this program:

  • educational projects
  • timelines insert historical pics & customize for your history curriculum
  • design photo cards (start your own business)
  • fashion design My daughter (11) is about to learn how to scan her fashion drawings in, choose colors, and create different fabrics. Some business ideas for this feature: design paper doll sets; create embroidery patterns; design graphics logos for t-shirts
  • digital scrapbook pages
  • scrapbooking to learn
  • much, much more

Here are a couple of our projects:

My husband is getting ready to open his own lab. He had already created his logo on another program we have, but could not enlarge it without distorting it. He was able to enlarge it clearly with Graphics Toolbox, and also clean it up & refine it.

I decided to create a silly photo to show you some of the program’s features. Hubby helped! You can click on the picks to get a bigger view.

Last year, my kids made this Leprechaun Trap:

I decided to use this photo of  Sweetpea and give her a bit of Irish flair:

Here is the cutie-patootie end result:

This is what we did:

  • Pulled the image of Sweetpea off using the Irregular Frame Tool
  • Changed the color of her dress using Tonal Color Change
  • Resized the image to fit in the chair
  • Used the Watercolor Pen to blend her image into the background of the chair photo
  • Changed the ball of silver foil to gold using the Airbrush Pen
  • Erased something stuck to the table by blending it in with the Watercolor pen

Things you should know:

  • System requirements: Microsoft® Windows® NT, 2000, XP or Vista 32-bit,  512MB of RAM,  80 MB of free hard-disk space
  • Layers vs Pixels – most graphics programs use layers. You create layers & then you can move them around. This program works with pixels. You have to think of it as gluing something down. This can be hard to get used to and you will want to save your work as you go along. Hubby was frustrated with this at first because he is used to layers. He says he would choose this program over any of the others, though, because of the level of control with pixels. I didn’t have as much trouble because I’ve just dabbled with layers.
  • Layout – your workspace is to be viewed like a tabletop, not the page you are creating. You can design several different elements on it and then assemble them into your finished product. Again, Hubby had to re-train his brain while it made complete sense to me. (I have a need to see all my pieces while I am creating something.)
  • Tools – there are no drop downs. All of your tools are on the right hand side of your screen. When you choose a tool, several options are then given to choose from. It is another thing to get used to, but I it works for me.

Things we like:

  • The zoom feature is so much easier to use. You control the zoom with your cursor and mouse.
  • The color library is unbelievable! You will be able to match & customize anything you can dream up.
  • The Tools are just amazing. You can choose the tiniest detail in an image and change it however you want.

I would encourage you to take advantage of  a 30-day Free Trial. 30 days is long enough to read the manual, view some tutorials, and really get a feel for this program. If you can spend some time and get used to the differences, I think you will really be impressed by what this program can do.

The Nitty Gritty:

  • $149 for 1 user license, discount for 2+ users

Value: This is a very fair price for all of the features it offers.

See what my TOS Crew Mates have to say about Graphics Toolbox!

I received the Graphics Toolbox program free  for the purpose of giving an honest review. No other compensation was given.

Share this:

  • Click to share on Pinterest (Opens in new window)
  • Click to share on Facebook (Opens in new window)
  • Click to share on Twitter (Opens in new window)
  • Click to share on Reddit (Opens in new window)
  • Click to share on Tumblr (Opens in new window)
  • Click to share on LinkedIn (Opens in new window)
  • Click to share on Pocket (Opens in new window)
  • Click to email a link to a friend (Opens in new window)
  • Click to print (Opens in new window)

review – Presidential Penmanship

March 6, 2010 By: amyswanderingcomment

Zeezok Publishing sent us a Presidential Penmanship Italic Style Complete Program CD to review. This program has something for all ages, grades K-12. Students practice handwriting by copying quotes, speeches, and famous documents from American history. It is a great fit for our family of Charlotte Mason wannabes.

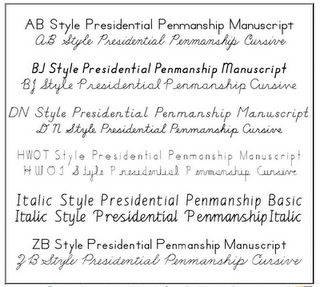
There are six styles available:

You can see samples of the Italic Program HERE.

Things I like:

  • It works for all of my kids.
  • Easy to print the pages I want to use.
  • It is meaningful work, not just busywork.
  • The quotes lead to some good conversations.

We are learning italic handwriting, so we have just dabbled a bit with this copywork. It will definitely be a part of next year’s curriculum plan. The quotes  will mesh perfectly with our Early American History plans!

The Nitty Gritty:

  • $39.99 for the complete program on CD or e-book
  • $9.99 for individual grades

Value: This program is a great value. It covers every grade and is non-consumable.

See what the TOS Crew has to say about Presidential Penmanship. Some members received the Great Musicians series, so be sure to check that out!

Share this:

  • Click to share on Pinterest (Opens in new window)
  • Click to share on Facebook (Opens in new window)
  • Click to share on Twitter (Opens in new window)
  • Click to share on Reddit (Opens in new window)
  • Click to share on Tumblr (Opens in new window)
  • Click to share on LinkedIn (Opens in new window)
  • Click to share on Pocket (Opens in new window)
  • Click to email a link to a friend (Opens in new window)
  • Click to print (Opens in new window)
  • « Previous Page
  • 1
  • …
  • 202
  • 203
  • 204
  • 205
  • 206
  • …
  • 305
  • Next Page »

welcome

apple-FBapple Pinapple IG

Back to School Subscribe

Categories

Recent Comments

  • marydonnaleelong on Homeschool for Free: Art
  • Amy Natzke on Roman History Printable Resources
  • Jessica on Homeschool for Free: Complete Curriculum
  • Brenda on Free Printable Reformation Resources
  • Jeni on Tips for Planning a Fundraiser Garage Sale

~Archives~

Be My Facebook Friend!

  • © Amy's Wandering, 2006-2021. Unauthorized use and/or duplication of this material without express and written permission from this blog’s author and owner is strictly prohibited. Links may be used, provided that full and clear credit is given to Amy's Wandering at amyswandering.com with appropriate and specific direction to the original content.
    October 2025
    S M T W T F S
     1234
    567891011
    12131415161718
    19202122232425
    262728293031  
    « Nov    

    HSSeasonsFBnew

    Follow Amy T @ Are We There Yet?'s board Homeschool - Organize on Pinterest.
    Facebook

    Copyright © 2025 · Modern Blogger Pro Theme By, Pretty Darn Cute Design